Engo Winch - Part II
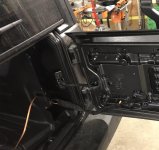
Now you attach the 2 brackets using the stock 4 bolts (2 on each side). The main winch plate will bolt to the 4 carriage bolts facing forward. It's hard to see in this picture. Compare to the picture in the previous post. One word to the wise. When you loosely bolt the passenger side bracket on, put the two carriage bolts through FIRST otherwise you won't be able to get them in due to the Electronic Sway Bar Disconnect.

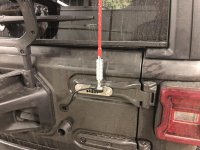
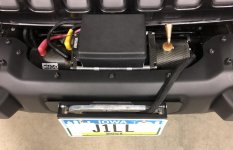
Finally, you bolt the main winch plate onto those two brackets (with the carriage bolts). Two large zip ties are included to keep the holes aligned where the bumper will bolt back up (the 4 inner bolts (2 on each side)). I decided to put 4 (1/2") bolts in place to keep the holes lined up. You can see the Engo 10K synthetic laid out. I placed two pieces of green tape on the grill. I decided to adhere a clear piece of 3M vinyl paint protectant on the bottom of the grill. The cables coming off the rear of the winch were pressing very tightly against the grill and I wanted to add some protection.

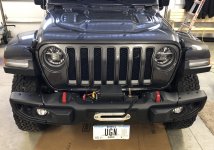
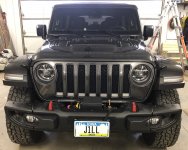
After routing the 2 cables to the battery, removing the 4 (temporary 1/2") bolts, bolting the Engo winch down to the plate, attaching the aluminum fairlead with the Warn fairlead bracket (which also has two holes for mounting the license plate), you can reattach the JL Rubicon steel bumper. Lastly, you tighten up all the carriage bolts and bracket bolts to make sure everything fits tightly.

I did have to put a bend in the license plate before bolting it back on (so it would be vertical). My Engo 10K synthetic winch fit perfectly in the space provided by removing the steel 'filler' plate. The only thing I didn't like was how tight the winch cables pushed against the lower part of the front grill. Overall, everything went pretty well.
I do have to enlarge 2 of the holes on the factory lower steel skid plate to get it to fit, but that's for tomorrow.
Summary: Yes. An older (7 yrs old) Engo 10K synthetic winch will mount nicely in the JL factory steel bumper with the Warn JL winch plate.
Now you attach the 2 brackets using the stock 4 bolts (2 on each side). The main winch plate will bolt to the 4 carriage bolts facing forward. It's hard to see in this picture. Compare to the picture in the previous post. One word to the wise. When you loosely bolt the passenger side bracket on, put the two carriage bolts through FIRST otherwise you won't be able to get them in due to the Electronic Sway Bar Disconnect.
Finally, you bolt the main winch plate onto those two brackets (with the carriage bolts). Two large zip ties are included to keep the holes aligned where the bumper will bolt back up (the 4 inner bolts (2 on each side)). I decided to put 4 (1/2") bolts in place to keep the holes lined up. You can see the Engo 10K synthetic laid out. I placed two pieces of green tape on the grill. I decided to adhere a clear piece of 3M vinyl paint protectant on the bottom of the grill. The cables coming off the rear of the winch were pressing very tightly against the grill and I wanted to add some protection.
After routing the 2 cables to the battery, removing the 4 (temporary 1/2") bolts, bolting the Engo winch down to the plate, attaching the aluminum fairlead with the Warn fairlead bracket (which also has two holes for mounting the license plate), you can reattach the JL Rubicon steel bumper. Lastly, you tighten up all the carriage bolts and bracket bolts to make sure everything fits tightly.
I did have to put a bend in the license plate before bolting it back on (so it would be vertical). My Engo 10K synthetic winch fit perfectly in the space provided by removing the steel 'filler' plate. The only thing I didn't like was how tight the winch cables pushed against the lower part of the front grill. Overall, everything went pretty well.
I do have to enlarge 2 of the holes on the factory lower steel skid plate to get it to fit, but that's for tomorrow.
Summary: Yes. An older (7 yrs old) Engo 10K synthetic winch will mount nicely in the JL factory steel bumper with the Warn JL winch plate.